Home ►
SPOT UG 2 Accessing SPOT
Last Modified: 11/20/2024
Location: FL, PR, USVI
Business: Part A, Part B
All organizations must submit an enrollment form and each user must register in the Identity Management (IDM) system to gain access to the SPOT portal. For detailed instructions and links to the required forms, visit
How to register for SPOT on our website.
All users are required to log in to SPOT at least once every 30 days. Any user IDs that do not meet this requirement will be considered inactive. Logging in to the Identity Management (IDM) system at
https://home.idm.cms.gov 
to reset your password is required to reactivate the SPOT access.
Sign in
Follow the below instructions to sign in to SPOT after enrollment and IDM registration is complete:
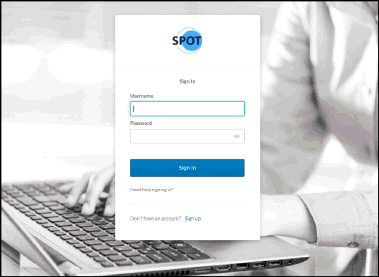
2. The IDM / SPOT Login page will appear.
Figure 1: SPOT Sign In
Note: If you have an IDM account and attempt to log on to SPOT before your SPOT application access request has been approved (i.e., no request submitted, request in pending status, or request in denied status), an error message will display upon login.
3. Enter your Username, Password, and click Sign In.
4. Click the “Send me the code” button.
To change your MFA device, select the type of device from the drop-down list in the center of the screen. All devices that are setup will display. If only one option is setup, you will not see the dropdown arrow. Multiple devices being setup is highly recommended. Detailed
multifactor authentication instructions are available.
Figure 2: Verification screen
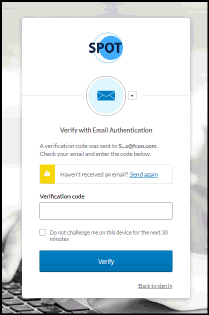
5. Enter your code and click the “Verify” button.
Other options are available here to resend the code, not be challenged on the device for the next 30 minutes and go back to the sign in screen.
Figure 3: Verification code screen
6. Read the provider portal warning and then click the “I acknowledge” button.
Figure 4: Provider portal warning
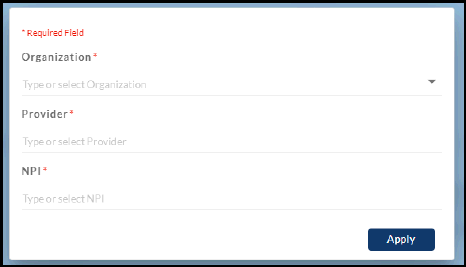
7. Select your organization, Provider / PTAN, and NPI from the drop-down menus. Click Apply.
Figure 5: Select your organization
8. Arrive at the SPOT homepage.
Figure 6: SPOT: Homepage
• Promo box:
SPOT’s homepage includes a graphical area reserved for quick access to hot topics, important information, and more.
• Alerts:
Additional news and alerts are displayed within the alerts box on the right.
Critical alerts, when applicable, may also be accessed via the blue warning banner at the top of the page
• Claims Summary:
The Claims Summary will reflect claim counts and payment amounts for claims that are in Approved to Pay status, Approved to Process status, claims processed from month to date, pending claims and claims processed from year to date.
• Payment Status Summary:
The Payment Status Summary will show Remittances that resulted in bank cleared checks or no payments within the past 90 days. Clicking on this chart will take you to the Payment Status Screen.
• Appeals Summary:
The Appeals Summary will show any Appeal Requests pending (Open Appeals) and finalized (Closed Appeals) received and closed within the prior 90 days. Clicking on the chart will take you to the Appeal Status page.
SPOT is organized based upon categories, which include Eligibility, MBI Lookup, Claims, Appeals, Claim Submission / ERA, Submit Documents, Retrieve Documents, and Financial Information. You may access any category by clicking on its corresponding tab label from the top menu options (see figure 6). There are also quick link icons available on the top blue menu bar:
• For the SPOT Help Desk email address and phone number, click the telephone icon.
• To access the mailbox quickly, click the envelope icon.
• The mailbox feature contains an inbound only service for portal account-related messages and correspondence, such as prior authorization outcomes.
• To exit the portal, click the log off icon or close the browser window.
Figure 7: Top navigation
SPOT also offers useful links available from the footer menu bar including Self-service tools, reference materials, educational events, site map, privacy policy, terms and conditions, and My IDM Account information.
Figure 8: Bottom navigation
As you access features within the portal, informational icons

will display when a hover tip is available.
As shown above, if you have roles for more than one organization or provider associated to your account, you will receive a pop up box to select the organization and/or provider when initially signing in.
To switch roles after the initial sign in:
1. Click the icon in the upper right.
Figure 9: Switch Roles icon
2. Select Switch Roles. The organization and provider selection box will display.
First Coast Service Options (First Coast) strives to ensure that the information available on our provider website is accurate, detailed, and current. Therefore, this is a dynamic site and its content changes daily. It is best to access the site to ensure you have the most current information rather than printing articles or forms that may become obsolete without notice.


 to reset your password is required to reactivate the SPOT access.


