Home ►
Using the PE Gateway
Last Modified: 10/4/2024
Location: PR, FL, USVI
Business: Part A, Part B
The provider enrollment gateway can be accessed by one of two ways:
2.
https://medicare.fcso.com/, select “Provider Enrollment” from the left hand side, and click the Gateway option from the pop-up menu.
The gateway welcome screen will look like this:
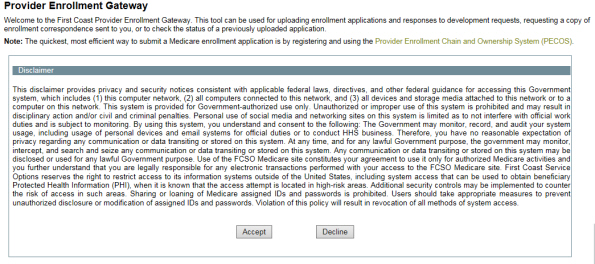
You must accept the disclaimer to access the gateway.Once you have accepted the disclaimer, you will reach the entry page for the gateway; please have your NPI and an email account accessible as you will be required to enter them to access the gateway.
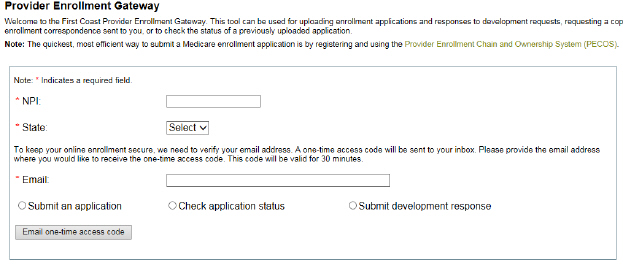
The entry page will look like this:
Enter your NPI, select the state in which you are enrolling from the drop-down menu (First Coast Service Options, Inc. services Florida, Puerto Rico, and U.S. Virgin Islands), enter your email address, and select an option. The options include:
• Submit an application
• Check application status*
• Submit development response*
*Please note that these two actions are only for paper applications that were submitted through the gateway. To check the status of a paper application that was submitted either via mail, fax, email, or PECOS, please visit
Check your application status, and have your NPI, PTAN, or DCN number. You can also check your application status by visiting
https://medicare.fcso.com/, select “Provider Enrollment” from the left hand side, and click “Check your Application Status” from the pop-up menu.
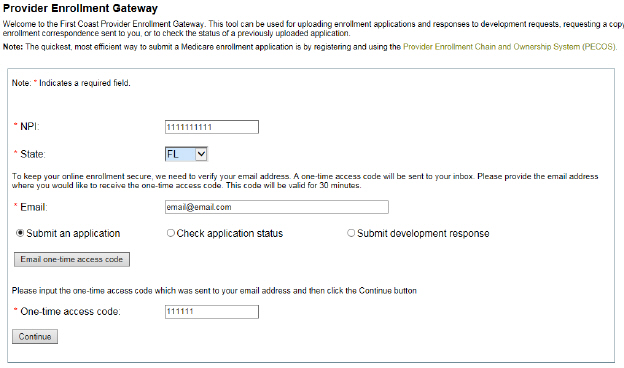
Once you have made your selection, you will receive a one-time 6-digit access code to the email address that you entered. Please note that this code is only to be used for this transaction and is only available for 30 minutes. Once it has been used, it cannot be used again. The email subject line will be: URGENT: Provider Enrollment Gateway Access. The email will include the 6 digit access code, which you will enter in the newly populated One-time access code field. Click the “Continue” button.
Example:
Regarding the NPI
The NPI that the user chooses to log in will be required to be entered each time the user wants to check on that application submission, submit returned development, or review a letter. The NPI that the user entered for the initial submission of the application(s) is tied to the submission ID.
Examples:
You are submitting an 855B for a group, and 4 855Is for different reassigners. You may log into the gateway only one time to upload all 5 applications under one submission using 1 designated NPI, or you may log into the gateway to submit each application separately using each provider’s distinct NPI. However, if you choose the second option, you will be required to use the provider’s distinct NPI to check on that application only.
If the user enters the NPI incorrectly the first time, the user may not be able to access any information for that application submission so it is important to ensure that the NPI entered for the initial submission is correct. The gateway will only validate that the NPI field contains a 10 digit number and will not validate if the NPI is registered to a provider or supplier. The user will not be able to check the status of another NPI’s application submission since the NPI is linked to the unique submission ID and DCN.
Examples:
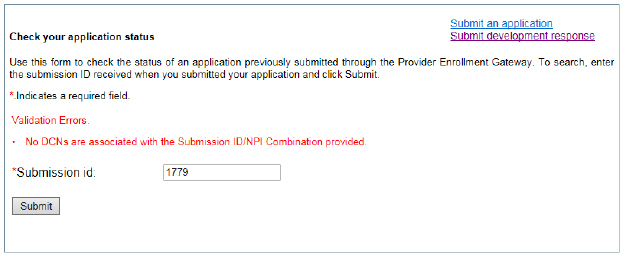
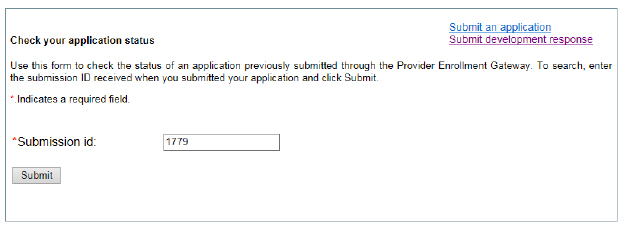
1. An application was submitted for a provider using NPI 1234567890 and submission ID 1564 was assigned. The user wants to check on an application that was submitted for NPI 1569845651 with submission ID 1779. The user will not be able to log into the gateway using 1234567890 with the submission ID 1779 for NPI 1569845651 to check on the application status for NPI 1569845651. You will receive the following error:
2. An 855B and 4 855Is were submitted using NPI 1659845100 and given submission ID 1222. If the user later tried to check the status of the applications with one of the individual’s NPIs and submission ID 1779, the status will not be able to be shown since the NPI and submission ID do not match. The same error message above will be provided.
Submitting an application
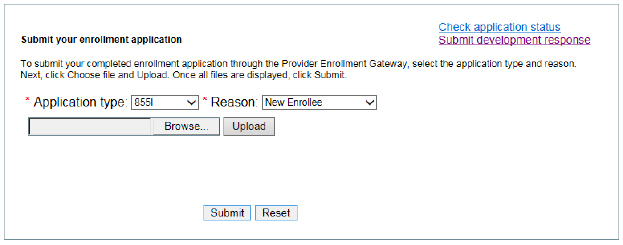
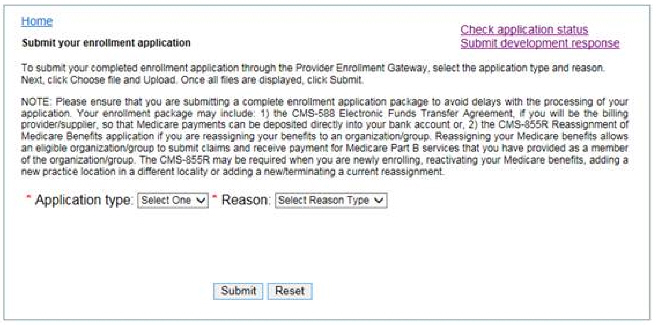
Once you have obtained entry into the gateway, you will need to select the Application Type and Reason for the submission from the drop-down menus.
Application Types and Reasons:
• 855O
• New enrollee
• You are an individual wanting to enroll in Medicare to order and certify services.
• Change of information
• You are an individual wanting to change information on your Medicare enrollment to order and certify services.
• Voluntary termination
• You are an individual wanting to voluntarily terminate your Medicare enrollment to order and certify services.
• 855I
• New enrollee
• You are an individual, sole proprietor, or sole owner wanting to enroll to in Medicare for the first time.
• Enrolling w/new MAC
• You are an individual, sole proprietor, or sole owner enrolled with a Medicare contractor and are now requesting to enroll in another Medicare contractor’s state/jurisdiction.
• Revalidation
• You are an individual, or sole proprietor revalidating your current Medicare enrollment in response to a revalidation request.
• Reactivation
• You are an individual, sole proprietor, or sole owner wanting to reactivate your Medicare billing privileges.
• Change of information
• You are an individual, sole proprietor, or sole owner wanting to make changes to your existing Medicare enrollment (includes establishing or terminating a reassignment).
• Voluntary termination
• You are an individual, sole proprietor, or sole owner wanting to voluntarily terminate your Medicare enrollment.
• 855B
• New enrollee
• You are a Part B group or organization wanting to enroll to in Medicare for the first time.
• Enrolling w/new FFS
• You are a Part B group or organization enrolled with a Medicare contractor and is now requesting to enroll in another Medicare contractor’s state/jurisdiction.
• Reactivation
• You are a Part B group or organization wanting to reactivate your Medicare billing privileges.
• Change of information
• You are a Part B group or organization wanting to make changes to your existing Medicare enrollment.
• Voluntary termination
• You are a Part B group or organization wanting to voluntarily terminate your Medicare enrollment.
• Revalidation
• You are a Part B group or organization, or sole owner revalidating your current Medicare enrollment in response to a revalidation request.
• 855A
• New enrollee
• You are a Part A organization wanting to enroll to in Medicare for the first time.
• Enrolling w/new FFS
• You are a Part A organization enrolled with a Medicare contractor and is now requesting to enroll in another Medicare contractor’s state/jurisdiction.
• Reactivation
• You are a Part A organization wanting to reactivate your Medicare billing privileges.
• Voluntary termination
• You are a Part A organization wanting to voluntarily terminate your Medicare enrollment.
• CHOW seller
• You are a Part A organization undergoing a Change of Ownership CHOW), and you are the seller/former owner.
• CHOW buyer
• You are a Part A organization undergoing a Change of Ownership CHOW), and you are the buyer/new owner.
• Acquisition merger/seller
• You are a Part A organization undergoing an acquisition or merger, and you are the seller/former owner.
• Acquisition merger/buyer
• You are a Part A organization undergoing an acquisition or merger, and you are the buyer/new owner.
• Consolidation former org
• You are a Part A organization that has consolidated with another organization, and you are the former organization.
• Consolidation new org
• You are a Part A organization that has consolidated with another organization, and you are the new organization.
• Change of information
• You are a Part A organization wanting to make changes to your existing Medicare enrollment.
• Revalidation
• You are a Part A organization revalidating your current Medicare enrollment in response to a revalidation request.
• 20134
• New enrollee
• You are an MDPP supplier wanting to enroll to in Medicare for the first time.
• Reactivation
• You are an MDPP supplier wanting to reactivate your Medicare billing privileges.
• Voluntary termination
• You are an MDPP supplier wanting to voluntarily terminate your Medicare enrollment.
• Change of information
• You are an MDPP supplier wanting to make changes to your existing Medicare enrollment.
• Revalidation
• You are an MDPP supplier revalidating your current Medicare enrollment in response to a revalidation request.
• 460
• N/A
Once you have selected your Application Type and Reason, click the “Browse” button to find the application that you have completed and saved on your computer. It is recommended to save the document as a notable name, like “John Smith CMS-855I application.PDF” as the gateway will not accept files that are not in a PDF format, or a non-CMS application type for initial enrollments. Click the “Upload” button once the appropriate document has been selected.
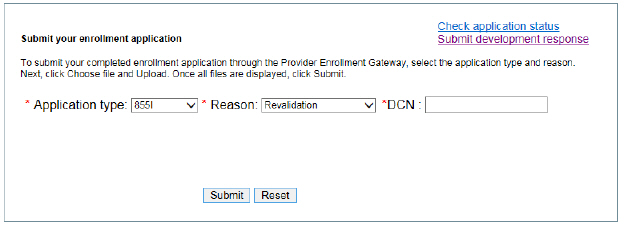
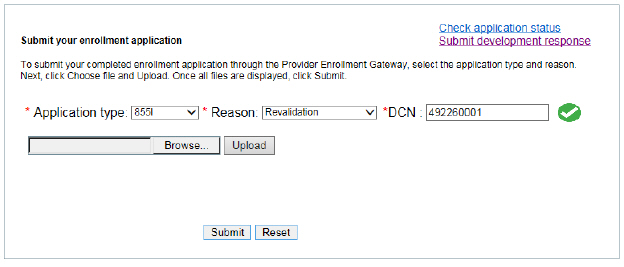
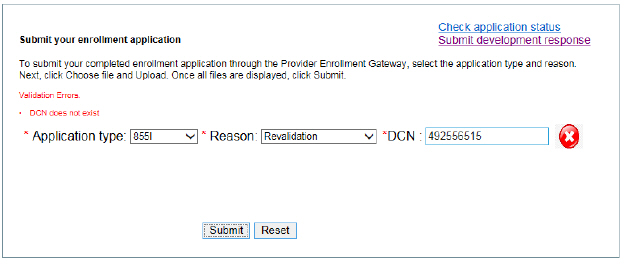
Special note for revalidations: You must have your revalidation DCN available to upload an application in response to a revalidation request. Once you have chosen the Reason of Revalidation, an additional box will populate to request the revalidation DCN that has already been created for you.
Correct revalidation DCN:
Incorrect revalidation DCN:
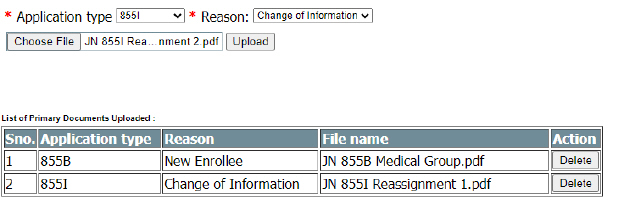
The gateway will display each document uploaded for the submission:
The user will be able to delete the documents prior to submission only. Once the user has selected the “Submit” button and the applications and documents have been submitted, the documents or applications cannot be rescinded.
When the application(s) have been submitted, you will receive a submission ID. The submission ID will display on the confirmation page of the gateway:
You will also receive an email confirming the submission ID and the NPI used for the application submission.
IMPORTANT: You must retain your submission ID and NPI to check the status or submit additional documentation for the application. You will receive a separate submission ID for each application submission.
Please allow a few days for First Coast to receive your application and assign it to a provider enrollment processing analyst. You will be able to obtain your document control number (DCN) immediately after the application(s) have been submitted. You will receive a DCN for each separate application submitted. The DCN can be obtained by checking your application status.
Checking your application status
The user can check the status of an application one of two ways:
1. Immediately after submitting an application to obtain the DCN.
2. Logging into the gateway after an application has already been submitted.
Checking the application status immediately after submitting an application to obtain the DCN.
1. To obtain the DCN immediately after submitting an application, click on the “CheckStatus” button:
2. Enter the Submission ID that you were just assigned, and select the “Submit” button:
3. You will receive information regarding the DCN, including the submitted application type, reason for application, DCN, and status of the application:
Please note that the application status is subject to change based on the processing of your application.
4. While checking on the status, you will be able to either submit another application, or submit a development response. Please note that you are submitting an application or development response for the NPI that you chose to use when initially signing in. If you are enrolling multiple providers, you may choose to log into the gateway using each individual NPI, but it is not required.
Checking the application status by logging info the gateway after an application has already been submitted.
1. Log into the gateway using the same NPI that you used to submit the application and select “Check application status”. Please note that the email address you choose to use is not required to be the same for all actions. You will receive another one-time code to the email address entered and enter it in the One-time access code field.
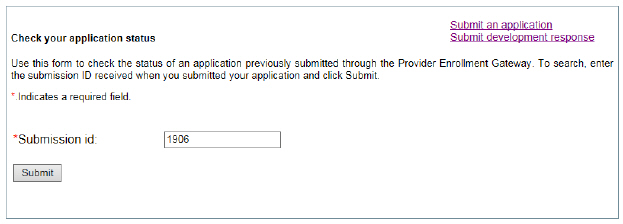
2. Enter the Submission ID that you were assigned, and select Submit:
3. You will receive information regarding the DCN, including the submitted application type, reason for application, DCN, and status of the application:
Please note that you will not receive a notification email when the status of your application changes since the gateway does not store your email address.
Submitting a Development Response
IMPORTANT: You can only submit a development response for an application that was submitted through the gateway. You may not submit a development response for an application that was submitted outside the gateway, e.g., PECOS web, mail, fax, etc.
1. Log into the gateway using the same NPI that you used to submit the application and select “Submit development response”. Please note that the email address you choose to use is not required to be the same for all actions. You will receive another one-time code to the email address entered and enter it in the One-time access code field.
Enter the DCN that you have been assigned; please refer to the DCN indicated on the development letter that you received. The gateway will confirm the DCN and NPI combination after the DCN has been entered:
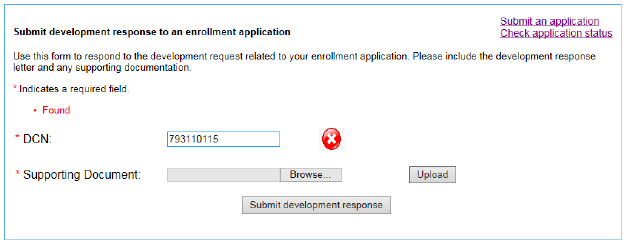
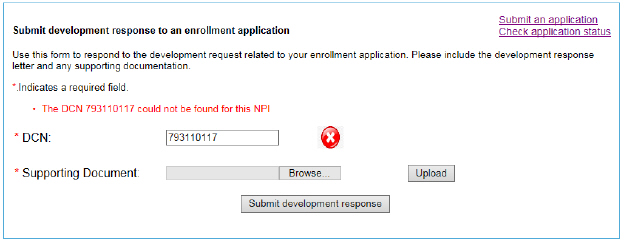
If the DCN and NPI combination do not match, you will receive this error:
If the DCN that you entered was assigned for an application that was not submitted through the gateway, you will receive this error:
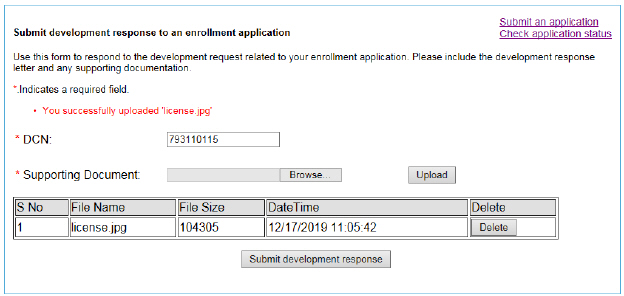
Find the application or documentation you wish to submit saved on your computer by clicking the “Browse” button. Please note that the file you wish to upload as development does not need to be saved as a PDF file. Once you have selected your document, click the “Upload” button. The user will be able to delete the documents prior to submission only using the “Delete” button.
Once the user has selected the “Submit development response” button and the applications and documents have been submitted, the documents or applications cannot be rescinded.
Accessing decision letters
The gateway application will make certain decision letters available after they have been issued. As we continue to develop the program, more decision letters will be available for review via the gateway.
1. Log into the gateway using the same NPI that you used to submit the application and select “Check application status”. Please note that the email address you choose to use is not required to be the same for all actions. You will receive another one-time code to the email address entered and enter it in the One-time access code field.
2. Enter the Submission ID that you were assigned and select Submit.
3. You will receive information regarding the DCN, including the submitted application type, reason for application, DCN, status of the application, and the Action column will display a new “View” button.
4. Click the “View” button and scroll down below the table.
5. Click on the PDF icon in the Action column, and the letter will be displayed in a new browser tab, where you will be able to view, save, or print the decision letter.
Please note that you will not receive a notification email when a decision letter has been issued through the gateway since the gateway does not store your email address.
Leaving the gateway
The gateway does not store your information, so you may simply close your browser and your current gateway session will be complete. If you wish to start your gateway session over to perform another action or resubmit an application for a different provider or supplier, you may select the Home link to be directed back the main page with the Disclaimer. You will be asked to confirm that you would like to start over.
First Coast Service Options (First Coast) strives to ensure that the information available on our provider website is accurate, detailed, and current. Therefore, this is a dynamic site and its content changes daily. It is best to access the site to ensure you have the most current information rather than printing articles or forms that may become obsolete without notice.


