

PE Gateway: Using the Gateway
Accessing the Provider Enrollment (PE) Gateway
The provider enrollment gateway can be accessed by one of two ways:
- Gateway link: medicare.fcso.com/enrollment-gateway
- Go to medicare.fcso.com, select Enrollment from the top bar, and click the Enrollment Gateway icon
The gateway welcome screen will look like this:
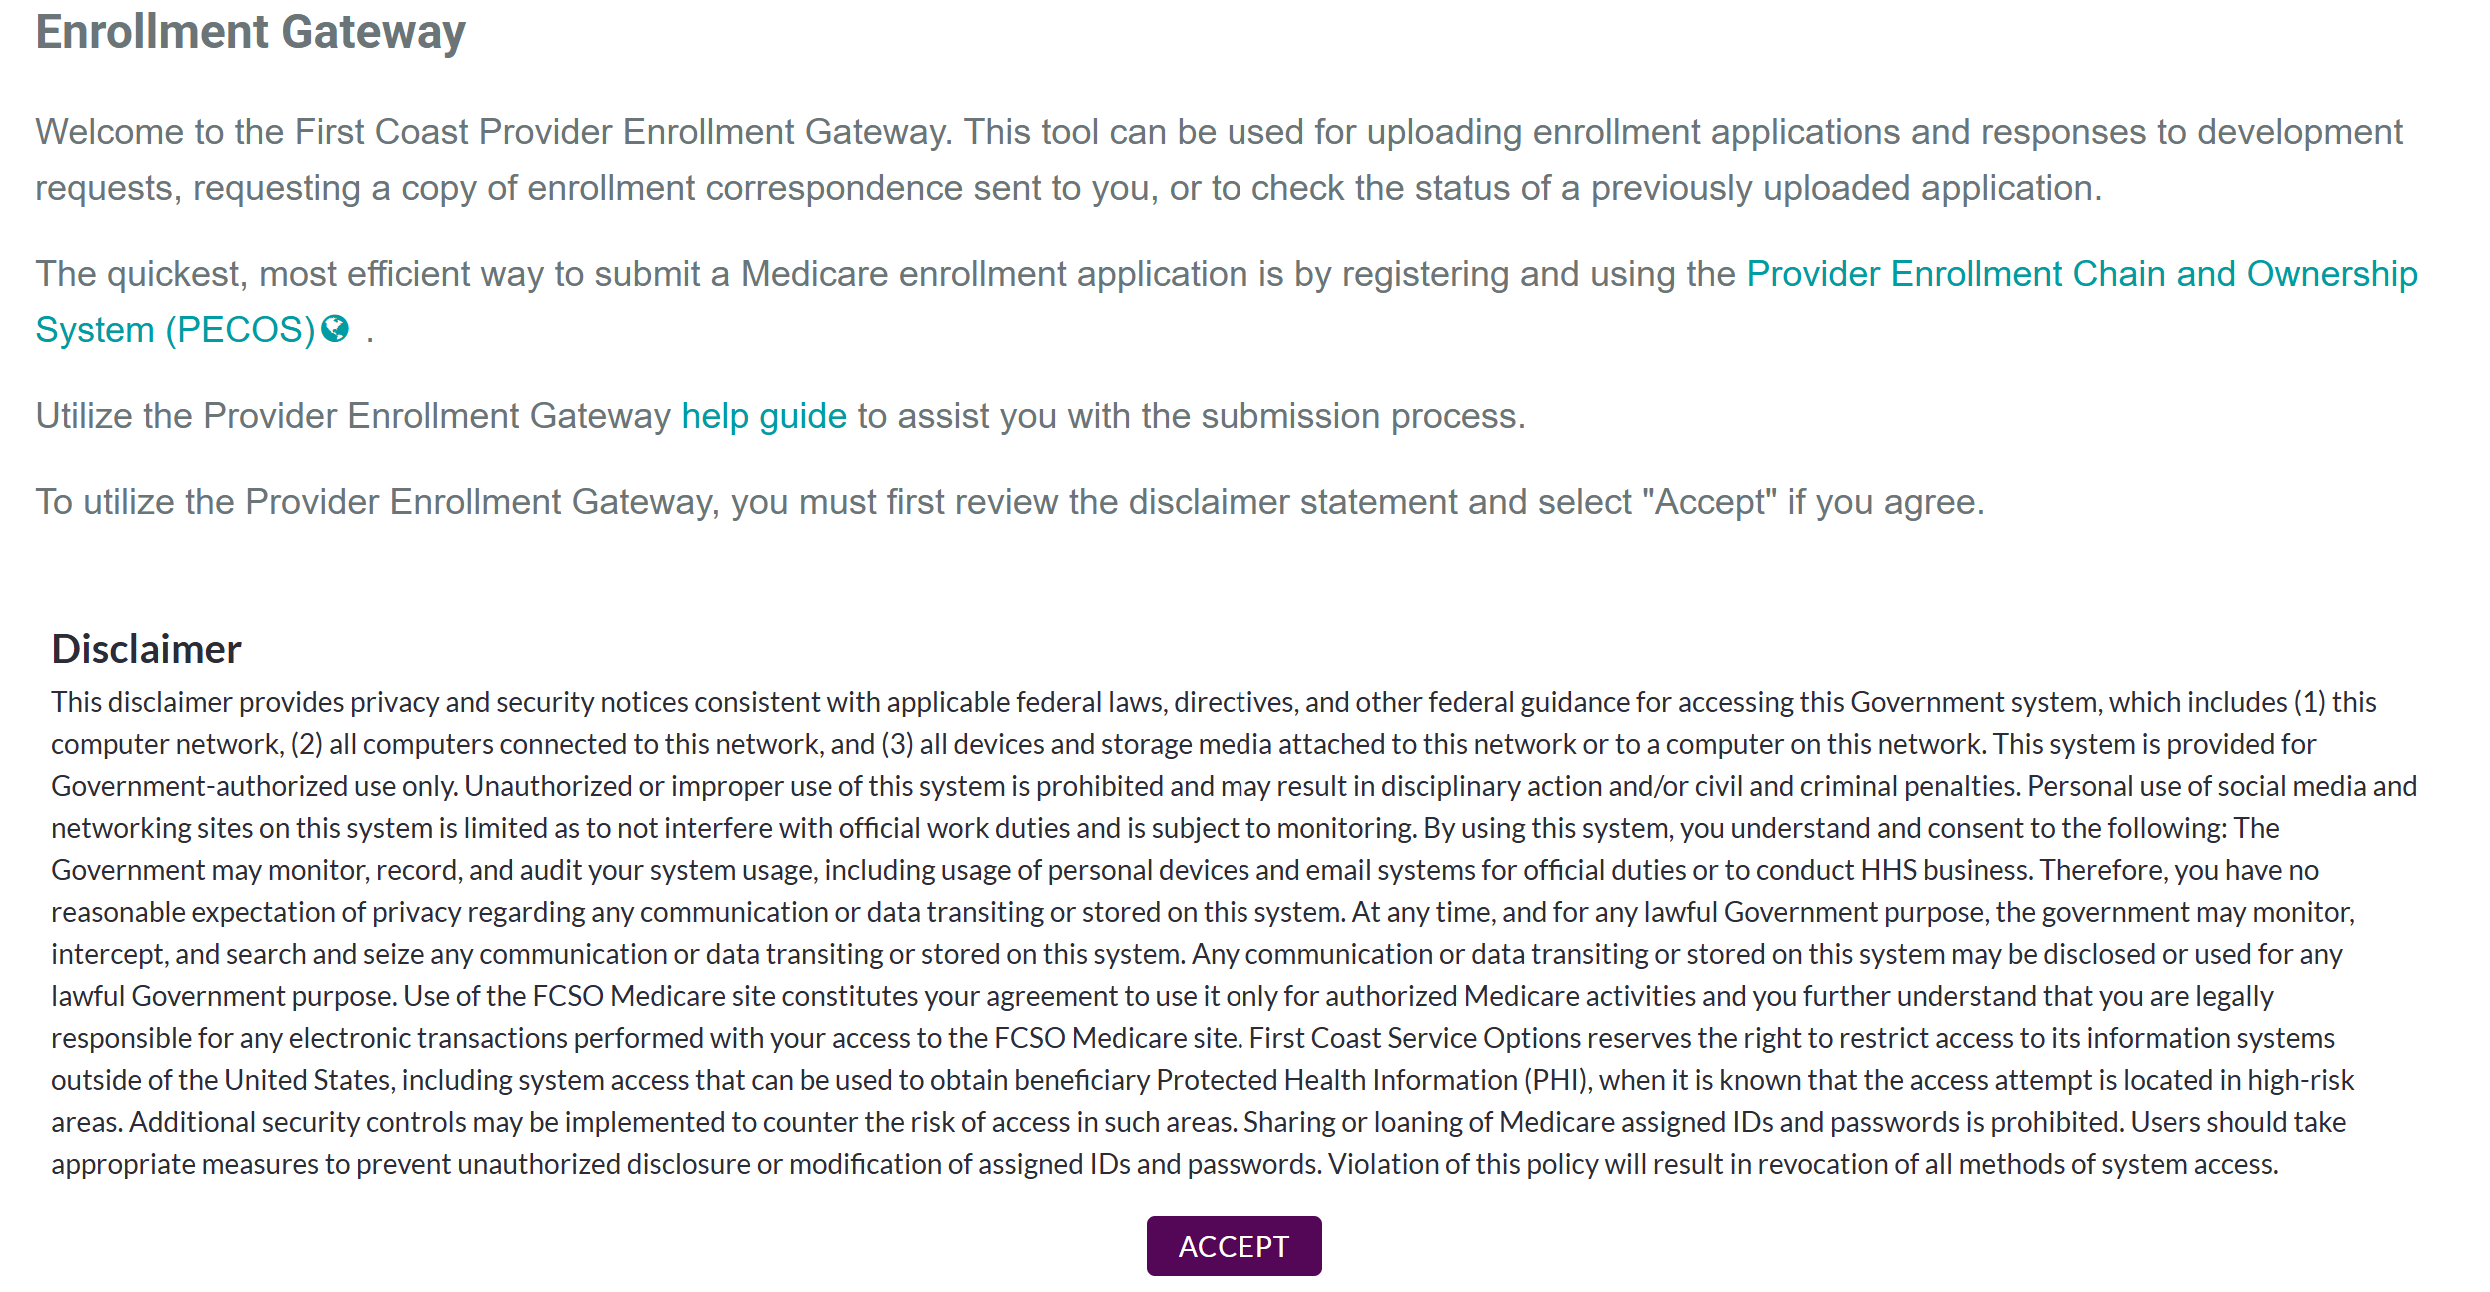
You must accept the disclaimer to access the gateway.
Once you have accepted the disclaimer, you will reach the entry page for the gateway; please have your NPI and an email account accessible as you will be required to enter them to access the gateway.
The entry page will look like this:
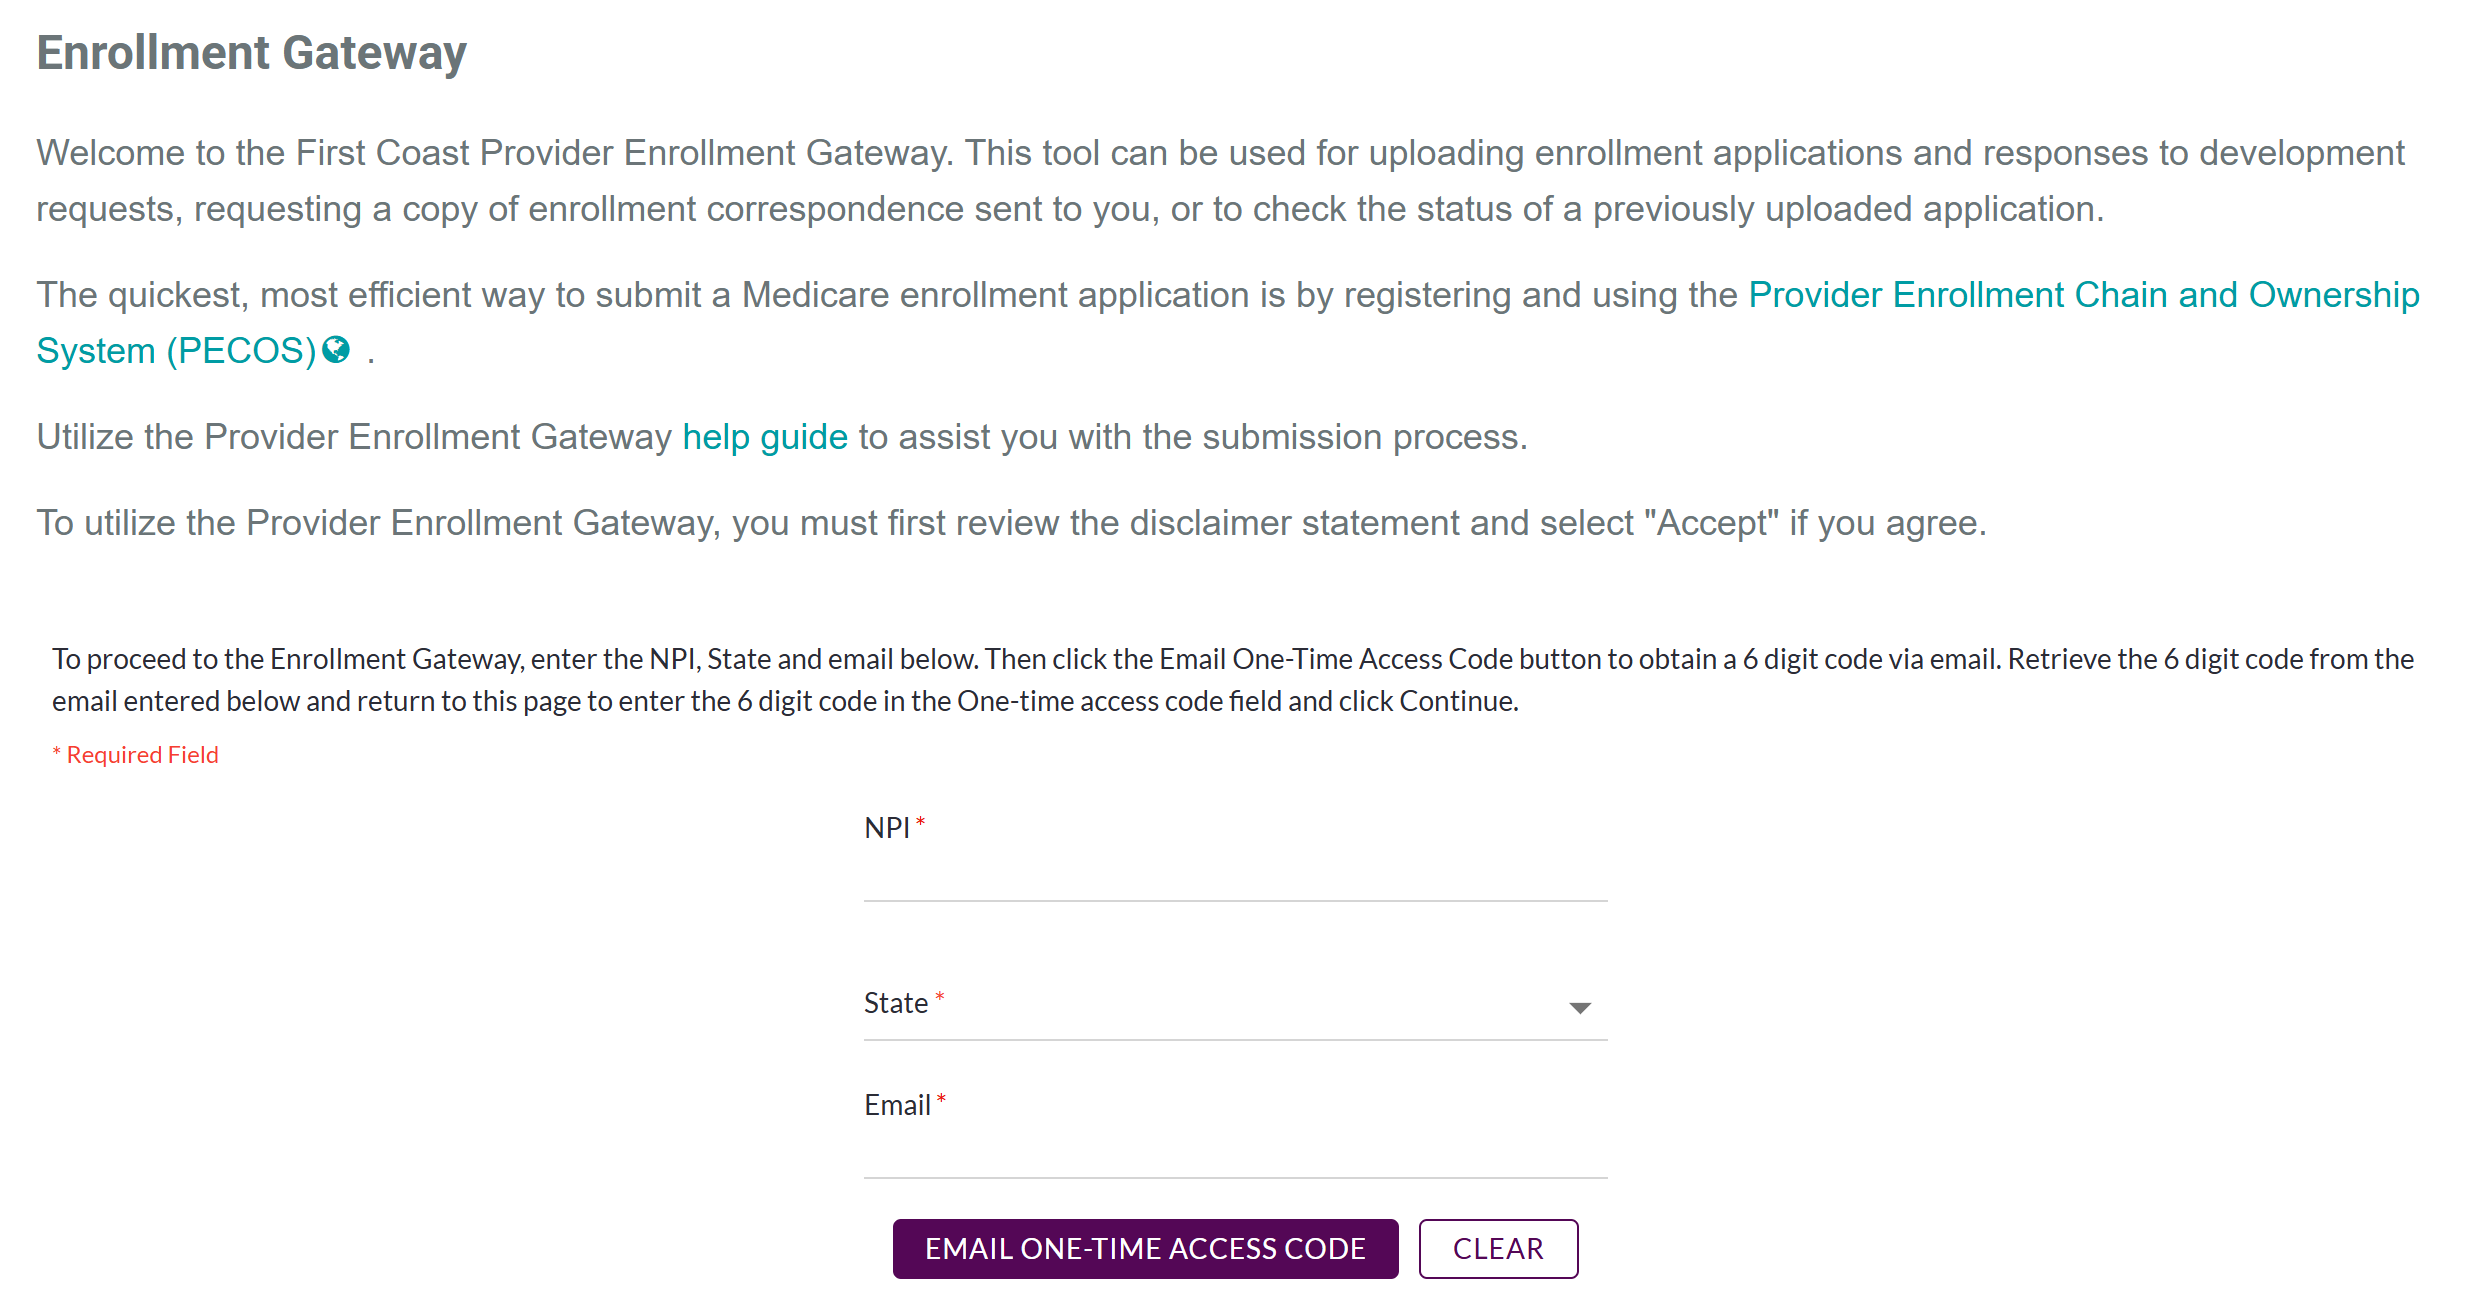
Enter your NPI, select the state in which you are enrolling from the drop-down menu, (Florida, Puerto Rico, or U.S. Virgin Islands), enter your email address, and select the email one-time access code button.
You will receive a one-time six-digit access code sent to the email address that you entered.
Please note that this code is only to be used for this transaction and is only available for 15 minutes. Once it has been used, it cannot be used again.
The email subject line will be: Urgent: Provider Enrollment Gateway Access. The email will include the six-digit access code, which you will enter in the newly populated one-time access code field. Click the “continue” button.
Regarding the NPI
The NPI the user chooses to log in will be required each time you want to check on that submission, submit returned development, or view a decision letter. The NPI entered for the initial submission of the application(s) is tied to the submission identification (ID).
Example:
- You are submitting a Clinics/Group Practices and Other Suppliers (CMS-855B) application for a group, and 4 Physicians and Non-Physician Practitioners (CMS-855I) applications for reassignment. You may log into the gateway only one time to upload all 5 applications under one submission using one designated NPI.
If you enter the NPI incorrectly the first time, you may not be able to access any information for that application submission, so it is important that the NPI entered for the initial submission is correct. You will not be able to check the status of another NPI’s application submission since the NPI is linked to the unique submission ID and DCN.
Examples:
- An application was submitted for a provider using NPI 1234567890 and submission ID 1564 was assigned. You want to check on an application that was submitted for NPI 1569845651 with submission ID 1234. You will not be able to log into the gateway using NPI 1234567890 and the submission ID for NPI 1569845651 to check on the application status for NPI 1569845651.
You will receive the following error message:
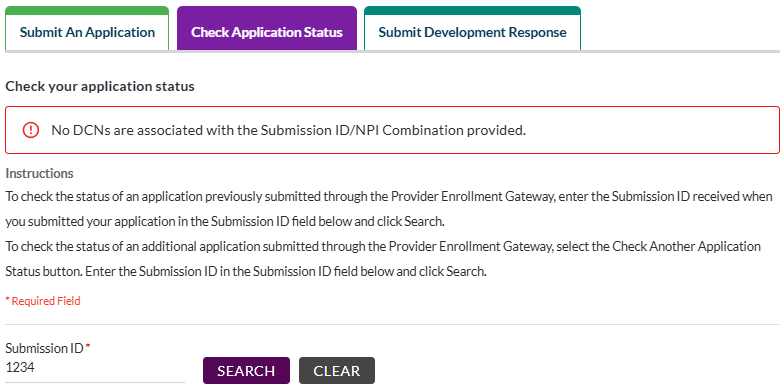
- An 855B and 4 855Is were submitted using NPI 1659845100 and given submission ID 1222. If the user later tried to check the status of the applications with one of the individual’s NPIs and submission ID 1234, the status will not be able to be shown since the NPI and submission ID do not match. The same error message above will be provided.
Submitting an application
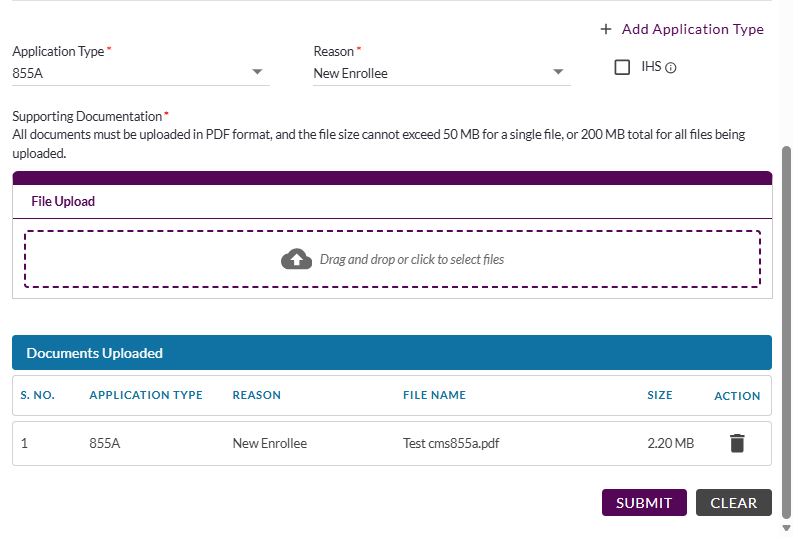
After obtaining entry into the gateway, you will need to select the application type and reason for the submission.
Once you have selected your application type and reason, drag and drop the PDF files you want to upload to the ‘File Upload’ box or click within the ‘File Upload’ box to then select the files from your computer to upload.
Click the “Submit” button once all appropriate documents for this application submission have been uploaded.
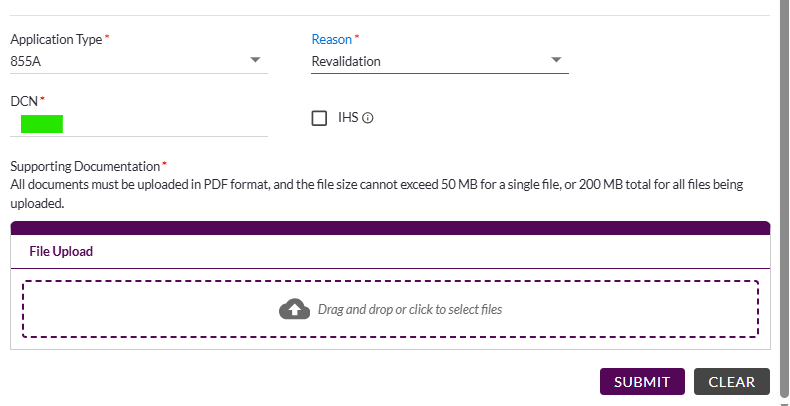
Special note for revalidations: You must have your revalidation DCN available in order to upload an application in response to a revalidation request. Once you have chosen the reason of revalidation, an additional line will populate to request the revalidation DCN that has already been created for you.
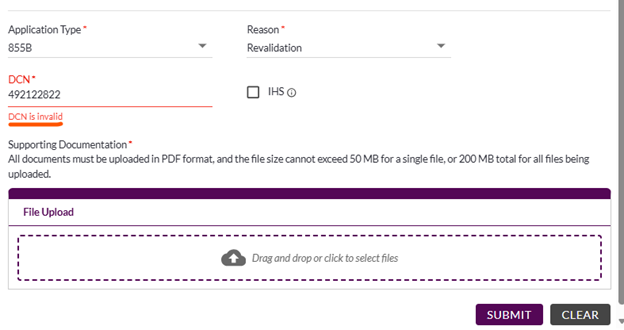
If an incorrect revalidation DCN is entered, you will receive the following error message:
The gateway will display each document uploaded for the submission:
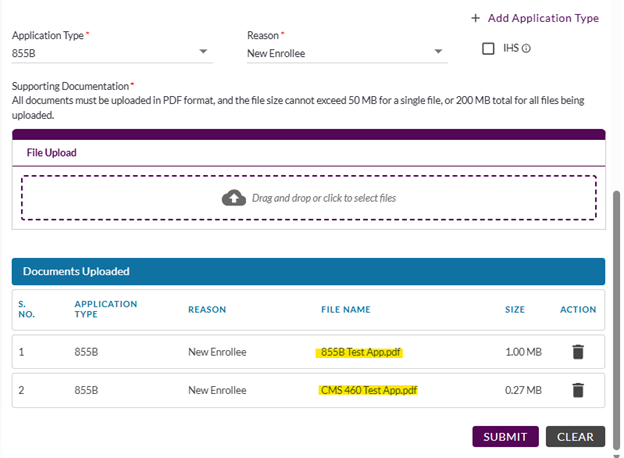
Click the "Submit" button once the appropriate supporting document has been uploaded.
You will be able to delete the documents prior to submission only. Once you have selected the “submit” button and the applications and documents have been submitted, the applications or supporting documents cannot be rescinded.
When the application(s) and supporting document(s) have been submitted, you will receive the submission ID and NPI used to submit the application via email confirming the submission and the submission ID will be displayed on the submission page:
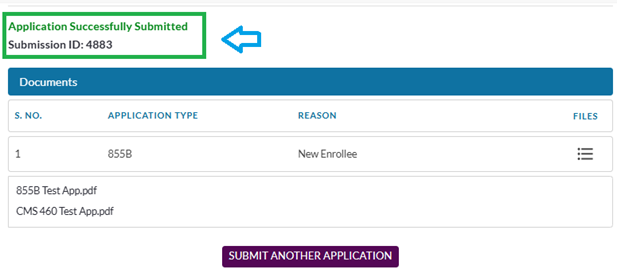
Important: You must retain your submission ID and NPI to check the status or submit additional documentation for the application. You will receive a separate submission ID for each application submission.
Please allow a few days for us to receive your application and assign it to a provider enrollment representative for processing. You will receive a DCN for each separate application type submitted immediately after the application(s) have been submitted. The DCN can be obtained by checking your application status.
Checking your application status
The user can check the status of an application one of two ways:
- Immediately after submitting an application to obtain the DCN.
- Logging into the gateway after an application has already been submitted.
Checking the application status immediately after submitting an application to obtain the DCN:
-
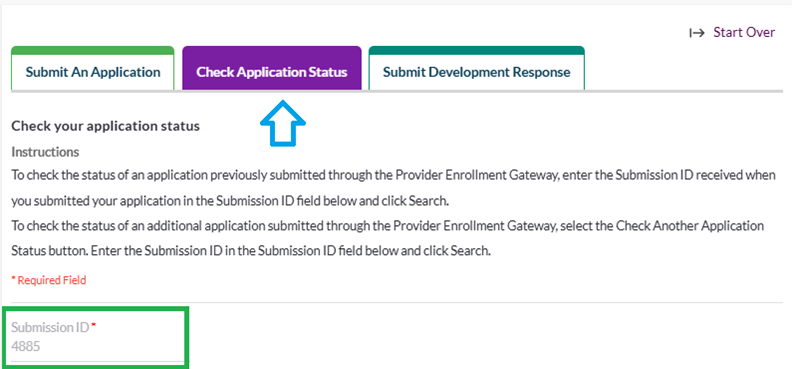
To obtain DCN immediately after submitting an application, click the “Check Application Status” tab and enter the submission ID you were assigned:
- You will receive information regarding the DCN, including the submitted application type, reason for application, DCN, and status of the application:
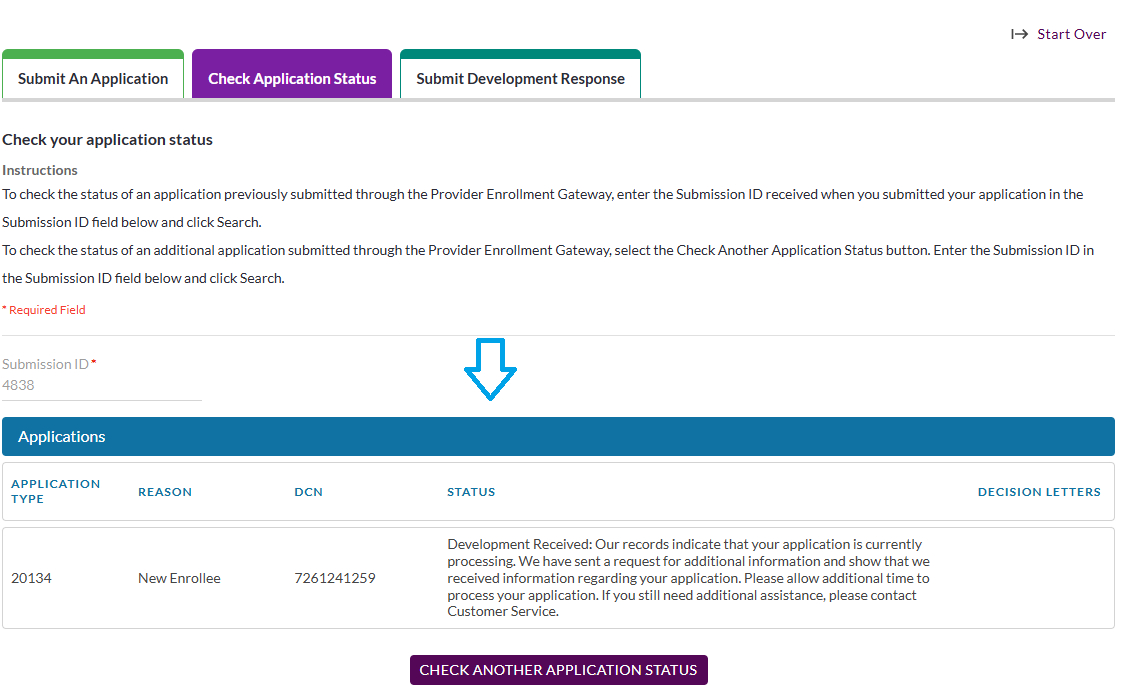
Note: The application status is subject to change based on the processing of your application.
- While checking on the status, you will be able to either submit another paper application or submit a development response. Please note that you are submitting a paper application or development response for the NPI that you chose to use when initially signing in. If you are enrolling multiple providers, log into the gateway using each individual NPI.
Checking the application status by logging into the gateway after an application has already been submitted:
- Log into the gateway using the same NPI that you used to submit the application and select the “check application status” tab. Please note that the email address you choose to use is not required to be the same for all actions. You will receive another one-time code to the email address entered and enter it in the one-time access code field.
-
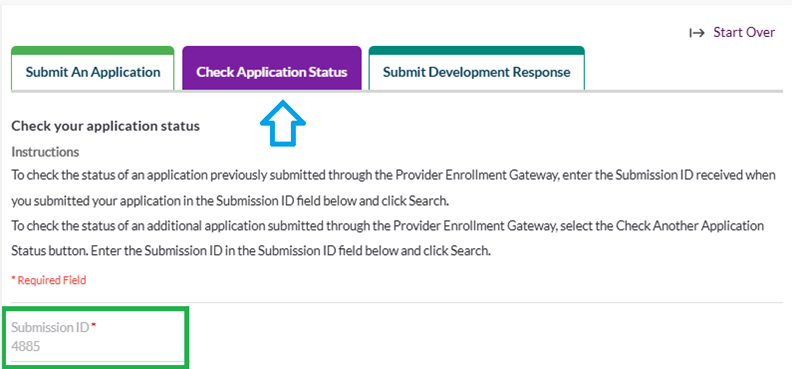
Enter the submission ID that you were assigned, and select Submit:
- You will receive information regarding the DCN, including the submitted application type, reason for application, DCN, and status of the application:
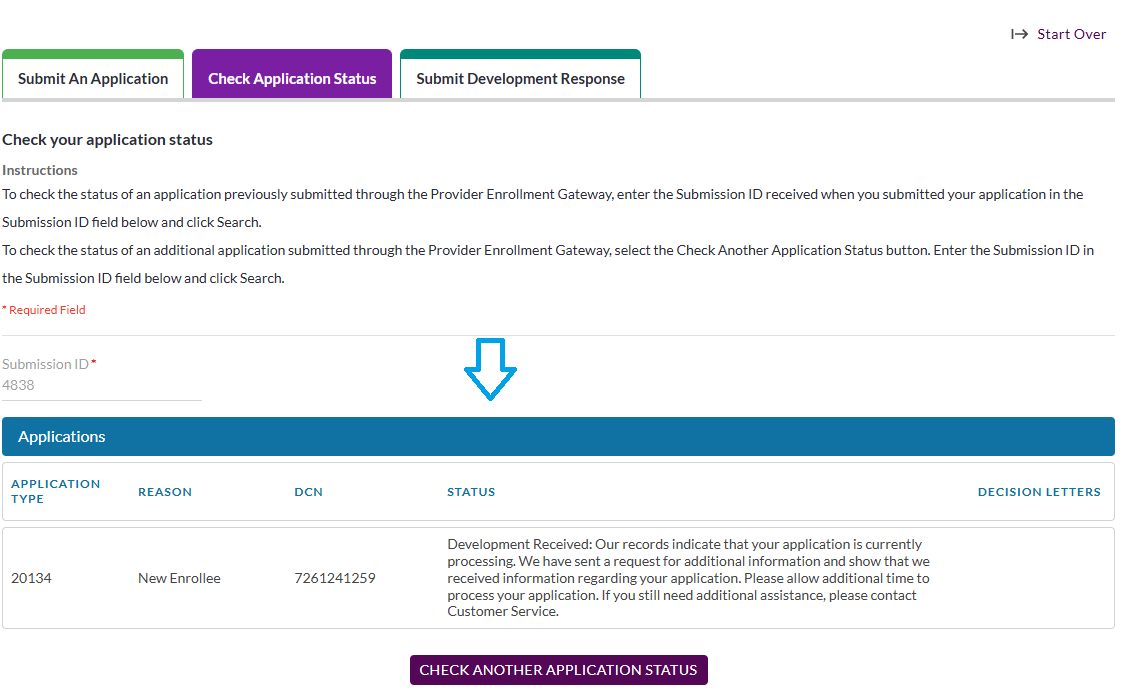
Note: You will not receive a notification email when the status of your application changes since the gateway does not store your email address.
Submitting a development response
- Log into the gateway using the same NPI that you used to submit the application and select the “Submit development response” tab. Please note that the email address you choose to use is not required to be the same for all actions. You will receive another one-time code to the email address entered and enter it in the one-time access code field.
-
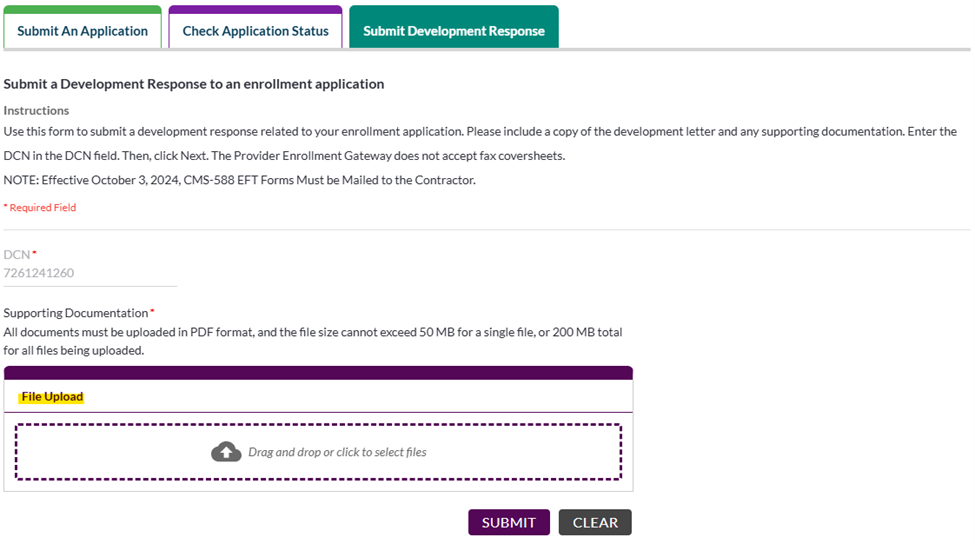
Enter the DCN that you have been assigned; please refer to the DCN indicated on the development letter that you received. The gateway will confirm the DCN and NPI combination after the DCN has been entered. If the combination is valid, you will receive a file upload option:
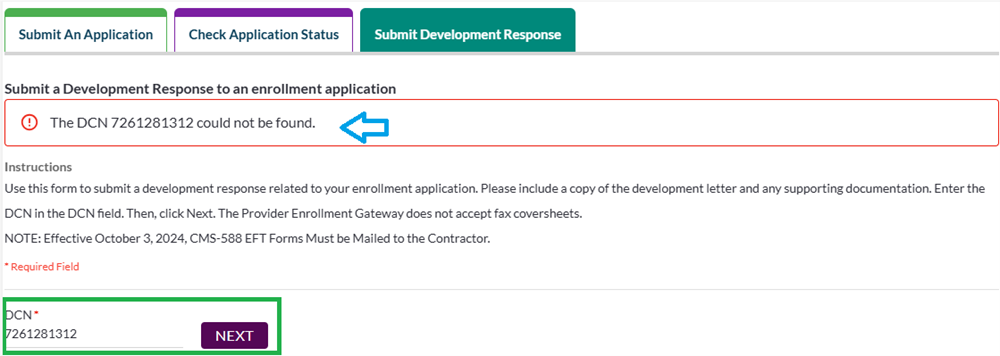
- If the DCN and NPI combination do not match, you will receive this error message:
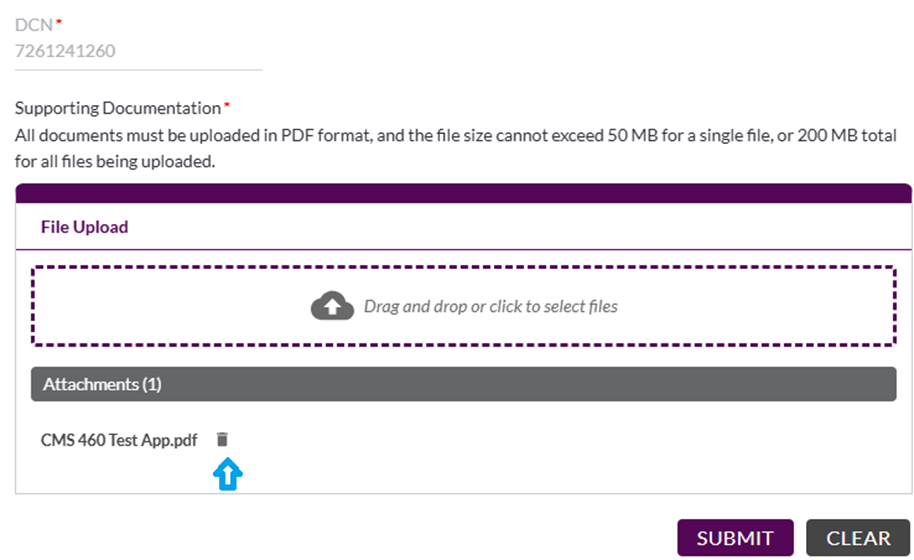
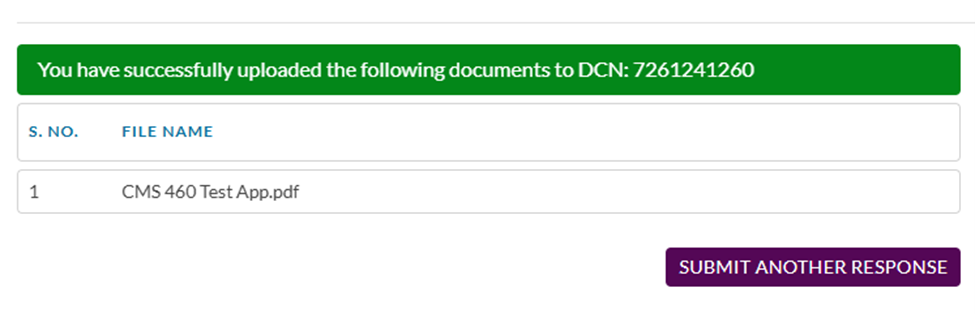
4. Drag and drop the PDF files you want to upload to the ‘File Upload’ box or click within the ‘File Upload’ box to then select the files from your computer to upload. You will be able to delete the documents prior to submission only using the trash can icon. Once the desired documents are uploaded to submit for development, select the ‘submit’ button.
5. Once you have selected the “submit” button and the applications and documents have been submitted, they cannot be rescinded.
Accessing decision letters
The gateway application will make certain decision letters available after they have been issued. As we continue to develop the functionality of the gateway, more decision letters will be available for review via the gateway.
- Log into the gateway using the same NPI that you used to submit the application and select the “check application status” tab. Please note that the email address you choose to use is not required to be the same for all actions. You will receive another one-time code to the email address entered and enter it in the one-time access code field.
- Enter the submission ID that you were assigned and select search.
- You will receive information regarding the DCN, including the submitted application type, reason for application, DCN, status of the application, and if a decision letter is available, a collapsed menu icon will be displayed. Select the icon to view available decision letters in PDF format.
-
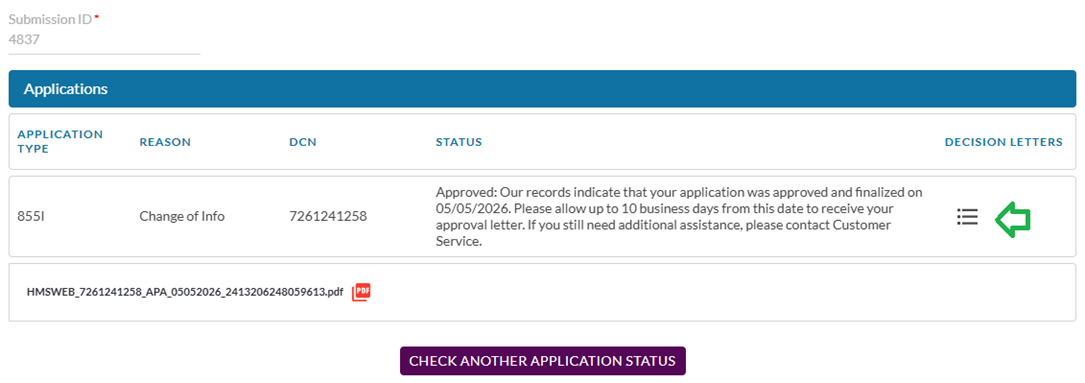
Click on the PDF icon, and the letter will be displayed in a new browser tab, where you will be able to view, save, or print the decision letter.
Note: You will not receive a notification email when a decision letter has been issued through the gateway since the gateway does not store your email address.
Leaving the gateway
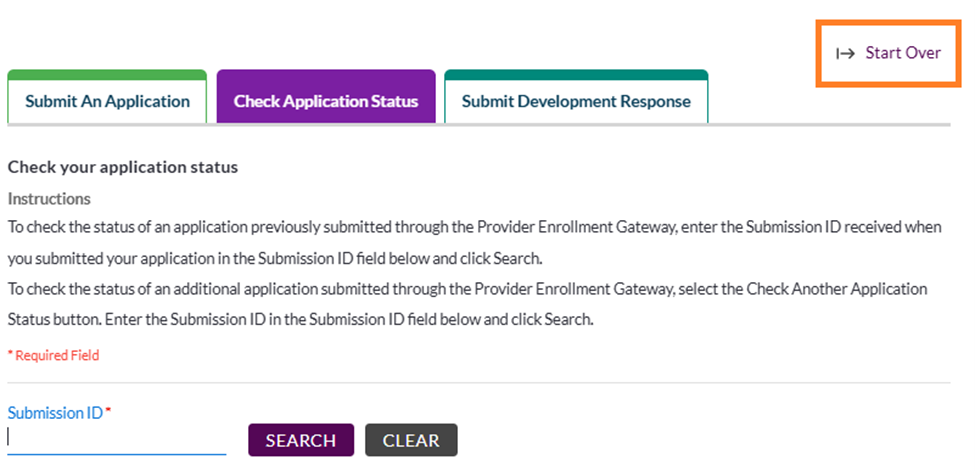
The gateway does not store your information, so you may simply close your browser and your current gateway session will be complete. If you wish to start your gateway session over to perform another action or resubmit an application for a different provider or supplier, you may select the "Start Over" option to be directed back to the main page with the disclaimer.